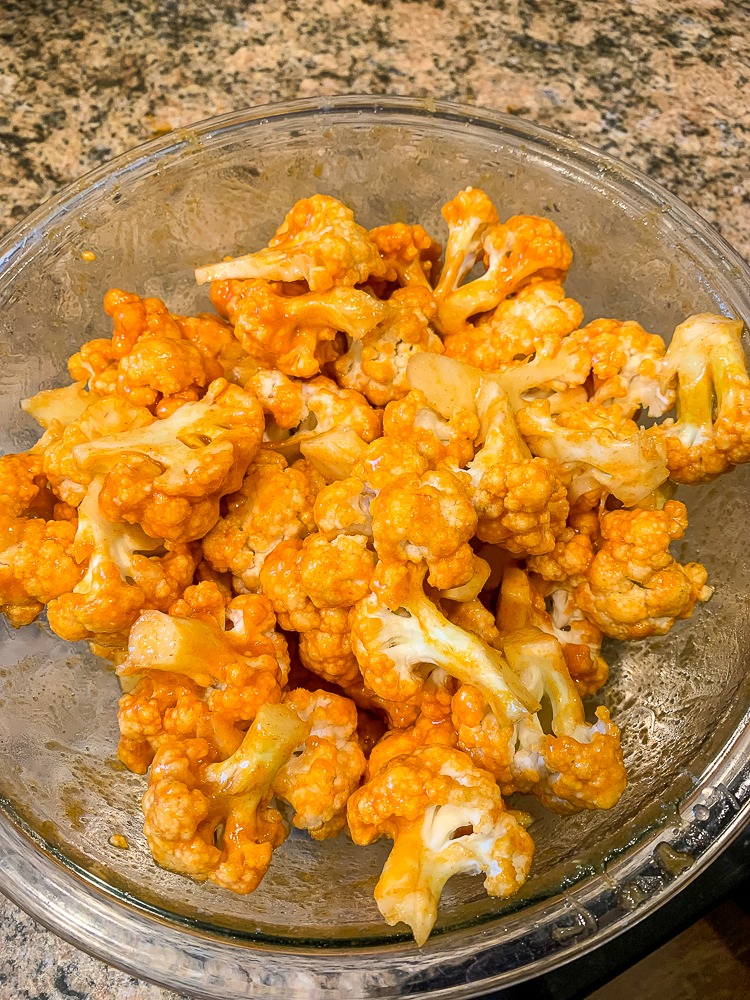
Buffalo cauliflower is a veggie dish that doesn’t have to be boring. These baked cauliflower florets come out tender in the center, lightly crisp on the outside, and coated in that bold, tangy buffalo sauce everyone reaches for first.
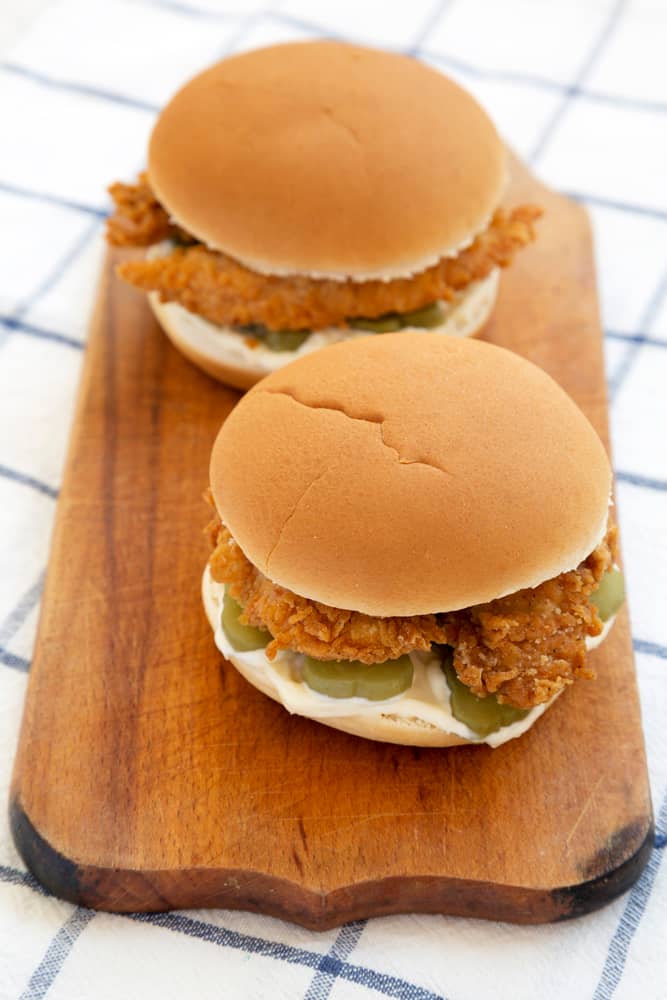
They work just as well as a fun appetizer for game day as they do alongside sandwiches, burgers, wraps, or a simple weeknight dinner. You get all the spicy, saucy flavor of buffalo wings, but in a lighter, veggie-packed version that is easy to make in the oven.
Table of Contents
Serve them hot with ranch, blue cheese, or a dairy-free dip, and you have a crowd-friendly dish that feels snackable, satisfying, and just a little addictive.

Why You’ll Love This Buffalo Cauliflower
Buffalo cauliflower is one of those flexible recipes that works for almost any occasion. Serve it with celery sticks and your favorite dip for game day, parties, potlucks, or casual snacking. Or add it to dinner as a bold side for burgers, sandwiches, wraps, grain bowls, or salads.
It is also an easy way to make cauliflower more exciting. Instead of plain roasted vegetables, you get tender florets with a crisp coating, tangy buffalo flavor, and a cool, creamy dip on the side. Best of all, everything is baked in one pan—no deep-frying or messy pot of oil required.
Why This Recipe Works
A few small details make a big difference in getting cauliflower that is crisp outside and tender inside:
- Use medium, evenly sized florets. Aim for bite-sized pieces, about 1½ to 2 inches wide. Smaller pieces can burn before they soften, while oversized florets take longer to become tender.
- Dry the cauliflower thoroughly. Pat the florets very dry with a clean kitchen towel or paper towels before coating. Excess moisture can thin the batter and lead to soggy cauliflower.
- Bake on a large, parchment-lined sheet pan. A roomy pan gives the florets space to brown instead of steam. Keep them in a single layer and avoid overlapping.
- Use the center oven rack. This helps the coating cook evenly without browning too fast on the bottom or top. The recipe is written for a standard bake setting rather than convection.
- Add the buffalo sauce near the end. Let the coating bake and crisp first, then toss or brush the florets with buffalo sauce before the final short bake. This gives you bold flavor without sacrificing as much crunch.
Now that you know the secrets to crisp, flavorful buffalo cauliflower, let’s get into the printable recipe card.
Quick Ingredient List for Baked Buffalo Cauliflower Bites
You’ll only need a handful of ingredients for these cauliflower bites.
- Cauliflower
- Buffalo Sauce
- All-Purpose Flour
- Smoked Paprika
- Garlic Powder
- Panko Breadcrumbs
- Salt and Pepper
- Low-Fat Milk or Unsweetened Non-Dairy Milk (I prefer almond milk whenever I use non-dairy milk for a recipe like this.)
Key Ingredient Roles
These simple ingredients work together to create buffalo cauliflower bites that are crispy on the outside, tender inside, and full of bold flavor.
- Cauliflower: The mild flavor makes it the perfect base for spicy buffalo sauce, while the florets become tender and lightly caramelized in the oven.
- All-purpose flour: Creates the base of the batter and helps it cling to each floret. A gluten-free all-purpose flour blend also works well here. I recommend using King Arthur gluten-free all-purpose flour because it’s one of the easiest gluten-free flours to work with for recipes like this crispy baked cauliflower.
- Milk: Thins the batter and gives it a smooth, creamy texture. Use low-fat milk or an unsweetened dairy-free milk, such as almond milk.
- Smoked paprika, garlic powder, salt, and pepper: These season the batter with smoky, savory flavor before the buffalo sauce goes on.
- Buffalo sauce: Adds the signature tangy heat. Choose a dairy-free buffalo sauce, or make your own with plant-based butter, to keep the recipe fully dairy-free.
- Panko bread crumbs: Add the final layer of crunch. Use gluten-free panko when needed.
Equipment
- Large rimmed baking sheet
- Parchment paper
- Medium-sized mixing bowl
- Whisk or fork
- Metal spatula
- Serving bowl
Now that you know what each ingredient does and what equipment you need, let’s get into the printable recipe card.

Printable Crispy Oven-Baked Buffalo Cauliflower Recipe Card
Ingredients
- 1 small cauliflower broken into florets
- 1/2 cup all-purpose flour can be gluten-free
- 1/2 cup low-fat milk or unsweetened almond milk
- 1/2 teaspoon smoked paprika
- 1/2 teaspoon garlic powder
- salt to taste
- black pepper to taste
- 1/3 cup buffalo sauce Look for "natural butter flavor" if you prefer dairy-free
- 2-3 tablespoons Panko bread crumbs can be gluten-free
Instructions
- Prep the oven and pan. Preheat the oven to 425°F. Line a large rimmed baking sheet with parchment paper and position an oven rack in the center.
- Make the batter. In a medium bowl, whisk together the flour, milk, smoked paprika, garlic powder, salt, and black pepper until smooth. The batter should be thick enough to coat the cauliflower.
- Coat the cauliflower. Pat the cauliflower florets very dry, then add them to the batter. Toss until each piece is evenly coated.
- Add panko and bake. Arrange the coated florets in a single layer on the prepared baking sheet, leaving space between them. Sprinkle the panko evenly over the top and gently press it onto the batter.
- Bake until crisp. Bake for 15 minutes, then carefully turn the florets. Return to the oven and bake for another 12–15 minutes, until the coating is golden and the cauliflower is nearly fork-tender.
- Sauce and finish. Transfer the cauliflower to a large bowl and toss lightly with the buffalo sauce. Return it to the baking sheet and bake for 5–8 minutes more, just until hot and crisp around the edges.
- Serve immediately. Serve warm with ranch, blue cheese, or your favorite dairy-free dipping sauce.
Notes
- Dry the cauliflower well: Pat florets completely dry before coating so the batter sticks and the cauliflower can crisp in the oven.
- Do not crowd the pan: Leave space between the florets. Use two baking sheets if needed so they roast instead of steaming.
- For the crispiest texture: Serve immediately after the final bake. Buffalo sauce will soften the coating as it sits.
- Gluten-free option: Use a cup-for-cup gluten-free flour blend and gluten-free panko.
- Dairy-free option: Use unsweetened dairy-free milk and a dairy-free buffalo sauce; serve with dairy-free ranch or dip.
- Leftovers: Reheat in a 375°F oven or air fryer until hot and crisp. Avoid the microwave, which will soften the coating.
Nutrition
Method for Making Oven-Baked Buffalo Cauliflower
This crispy oven-baked buffalo cauliflower is easy to make. Baking them just takes longer than mixing them up, so let’s jump right in!
Step One: Preheat Oven and Prepare Baking Sheet
Preheat the oven to 425 degrees Fahrenheit (218 degrees Celsius). Line a baking sheet with parchment paper and set aside.
Step Two: Mix Batter
Place the flour, milk, smoked paprika, garlic powder, salt, and pepper in the medium-sized mixing bowl. Use the electric mixer to combine the flour, milk, and spices. Make sure you get all the way to the bottom of the bowl to make sure nothing settles to the bottom. Let it sit for a few minutes to form a thick paste. (The flour needs time to properly absorb the moisture in the milk.)
Step Three: Prepare Cauliflower Florets
Cut the head of cauliflower into bite-sized florets. Rinse them, and then spread them on a clean towel and pat them dry. Make sure they’re completely dry before moving on to the next step.
Step Four: Coat Cauliflower Florets
Add the cauliflower florets to the mixing bowl. Toss to coat the florets with the batter.
Step Five: Roast Cauliflower
Spread the cauliflower in a single layer on the baking sheet. Bake for 30 minutes. Flip the cauliflower about halfway through the baking time for a more even crispiness.
Step Six: Add Buffalo Sauce and Panko Crumbs
Remove the cauliflower from the oven. Leave the oven on. Toss the cauliflower florets with the buffalo sauce and spread them out into an even layer on the baking sheet again. Sprinkle the panko crumbs over the top.
Step Seven: Return to Oven
Place the cauliflower on the lower rack of your oven. Bake for an additional 10-15 minutes until the cauliflower is tender and the coating is crispy.
Step Eight: Transfer to Bowl and Serve with Dipping Sauce
Transfer the cauliflower to a serving bowl and serve warm with your favorite dipping sauces. I like ranch dipping sauce.

Substitutions for Buffalo Cauliflower
This recipe is easy to adapt based on what you have on hand.
- Milk: Use low-fat dairy milk or any unsweetened dairy-free milk. Almond milk is a reliable choice, but oat milk and cashew milk also work well. Avoid sweetened or flavored varieties, which can change the buffalo flavor.
- Flour: Regular all-purpose flour works best for a crisp, sturdy coating. A gluten-free all-purpose flour blend can be used instead; choose one meant to replace flour cup for cup.
- Panko: Regular or gluten-free panko both add great crunch. Plain breadcrumbs work in a pinch, though the coating will be slightly less crisp.
- Cauliflower: Broccoli florets are a good substitute when cauliflower is unavailable. Cut them into similar bite-size pieces and check them a few minutes early, since broccoli can cook faster and become bitter if overdone.
- Buffalo sauce: Use your favorite bottled buffalo sauce, or make a homemade version. For a dairy-free recipe, choose a dairy-free sauce or make one with plant-based butter.
These swaps keep the recipe flexible without changing the crispy, spicy result.
Tips for Crispy Buffalo Cauliflower Bites
A few simple details make the biggest difference between crispy buffalo cauliflower and soggy florets:
- Dry the cauliflower well. Pat the florets dry before coating so the batter sticks properly and the cauliflower can crisp in the oven.
- Give each piece space. Arrange the florets in a single layer with room between them. Overcrowding traps steam and makes the coating soft.
- Use evenly sized florets. Medium, similarly sized pieces cook more evenly and become tender without burning.
- Wait to add the buffalo sauce. Bake the coated cauliflower until the exterior is crisp, then toss or brush with sauce near the end. Serve right away for the best texture.
- Reheat in the oven or air fryer. Leftovers will soften in the refrigerator, but they crisp up again much better in dry heat than in the microwave.
A Few Common Fixes
- Too spicy? Use a milder buffalo sauce or mix it with a little melted butter, vegan butter, honey, or maple syrup.
- Not crispy enough? Bake a few minutes longer, avoid crowding the pan, and broil briefly at the end while watching closely.
- Coating falling off? Make sure the florets are dry, and the batter is thick enough to cling before baking.
Air Fryer Instructions
For crisp buffalo cauliflower with a shorter cook time, the air fryer is a great option.
- Preheat the air fryer to 375°F for 3–5 minutes.
- Prepare the cauliflower as directed: coat the dry florets in batter, then add the panko.
- Lightly grease the air-fryer basket or use a perforated air-fryer liner. Arrange the florets in a single layer, leaving space between them. Cook in batches if needed.
- Air fry for 10–14 minutes, gently turning or shaking the basket halfway through, until the coating is golden and the cauliflower is nearly tender.
- Toss lightly with buffalo sauce, then return the florets to the air fryer for 2–3 minutes to heat the sauce and crisp the edges.
- Serve immediately with your favorite dip.
Air fryers vary, so start checking a few minutes early the first time you make this recipe.
What to Serve With Buffalo Cauliflower Bites
Buffalo cauliflower is easy to serve as an appetizer, snack, or flavorful side dish. For a classic game-day platter, add celery sticks, carrot sticks, and a bowl of ranch or blue cheese dressing.
For a dairy-free option, serve the cauliflower with dairy-free ranch or your favorite creamy plant-based dip.

You can also turn it into a more filling meal by serving it:
- In wraps with lettuce, shredded carrots, and ranch
- Over grain bowls with rice or quinoa, greens, and avocado
- On a salad with crunchy vegetables and extra buffalo sauce
- Alongside burgers, sandwiches, or grilled chicken
- As part of a snack board with celery, carrots, dips, and pita chips
Storage and Reheating
Buffalo cauliflower is best served fresh, when the coating is at its crispiest. Store any leftovers in an airtight container in the refrigerator for 3–4 days.
To reheat, spread the cauliflower in a single layer and warm it until hot throughout:
- Oven: Bake at 375°F for 8–12 minutes.
- Air fryer: Air fry at 350°F for 4–6 minutes, shaking once halfway through.
- Microwave: This works for convenience, but the coating will be soft rather than crisp.
For food safety, refrigerate leftovers within 2 hours and keep them at 40°F or below. Reheat leftovers to 165°F before serving.
FAQ for Crispy Oven-Baked Buffalo Cauliflower
We do sometimes get questions about this crispy oven-baked buffalo cauliflower! I did my best to answer the most commonly asked questions here. If you think of a question I haven’t answered yet, feel free to ask in the comments section, and we’ll do our best to answer as soon as possible!
Can I use frozen cauliflower?
Fresh cauliflower gives you the crispiest results, but frozen cauliflower can work in a pinch. Thaw it completely, drain off any liquid, and pat the florets very dry before coating. Because frozen cauliflower holds extra moisture, the coating may not get quite as crisp.
Can I make this without panko?
Yes. The cauliflower will still be flavorful without panko, but the coating will be less crunchy. Regular breadcrumbs are a good substitute, though panko gives the lightest, crispest texture.
Can I make buffalo cauliflower in the air fryer?
Yes. Air fry the battered and panko-coated florets at 375°F for 10–14 minutes, turning or shaking halfway through. Toss with buffalo sauce, then air fry for another 2–3 minutes. Cook in batches so the basket is not crowded.
Can I make this gluten-free or dairy-free?
Yes. For a gluten-free version, use a cup-for-cup gluten-free flour blend and gluten-free panko. For a dairy-free version, use unsweetened dairy-free milk, a dairy-free buffalo sauce, and your favorite plant-based dipping sauce.
Is buffalo cauliflower healthier than buffalo wings?
That depends on the ingredients, serving size, sauce, and dip you use. This baked cauliflower is a vegetable-forward alternative that does not require deep frying, but nutrition can vary widely from one recipe to another.
Can I serve buffalo cauliflower as a side dish?
Absolutely. It is great alongside burgers, sandwiches, wraps, grilled chicken, fish, rice bowls, or a simple green salad. I have sometimes had this as a side dish for lighter main dishes like Parmesan-crusted fish fillets. They go quite well together!
Can I make it ahead of time?
Buffalo cauliflower is best served right after baking, while the coating is crisp. You can cut the cauliflower and mix the dry ingredients ahead of time, then batter and bake just before serving.
More Appetizers and Sides to Try
Looking for more easy recipes to round out your snack spread or dinner table? These flavorful appetizers and vegetable sides are great for parties, game day, or casual weeknight meals.
- Oil-Free Hummus – A creamy, simple dip for veggies, pita chips, or wraps.
- Vegan Chili Fries – Crispy fries topped with hearty, plant-based chili.
- Blackened Shrimp Avocado Cucumber Bites – A fresh, spicy appetizer with plenty of texture.
- Healthy-ish Caramel Popcorn Made with Maca Powder – A lightly sweet snack for movie nights or parties.
- Best Crispy Brussels Sprouts Recipe – Golden, savory sprouts that make an easy vegetable side.
- Air Fryer Zucchini Slices with Crunchy Panko Breading – Crunchy, lightly breaded zucchini without deep frying.
You might also like these recipes when you need a crowd-friendly snack or an easy side dish with plenty of flavor.
Made This Buffalo Cauliflower?
Did you love these cauliflower florets? Feel free to let us know what you think in the comments section, and don’t forget to rate this recipe!