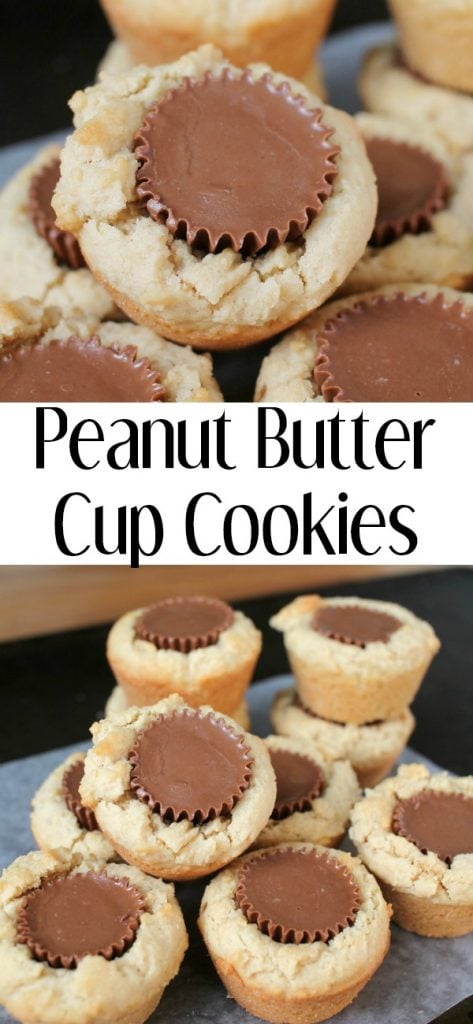
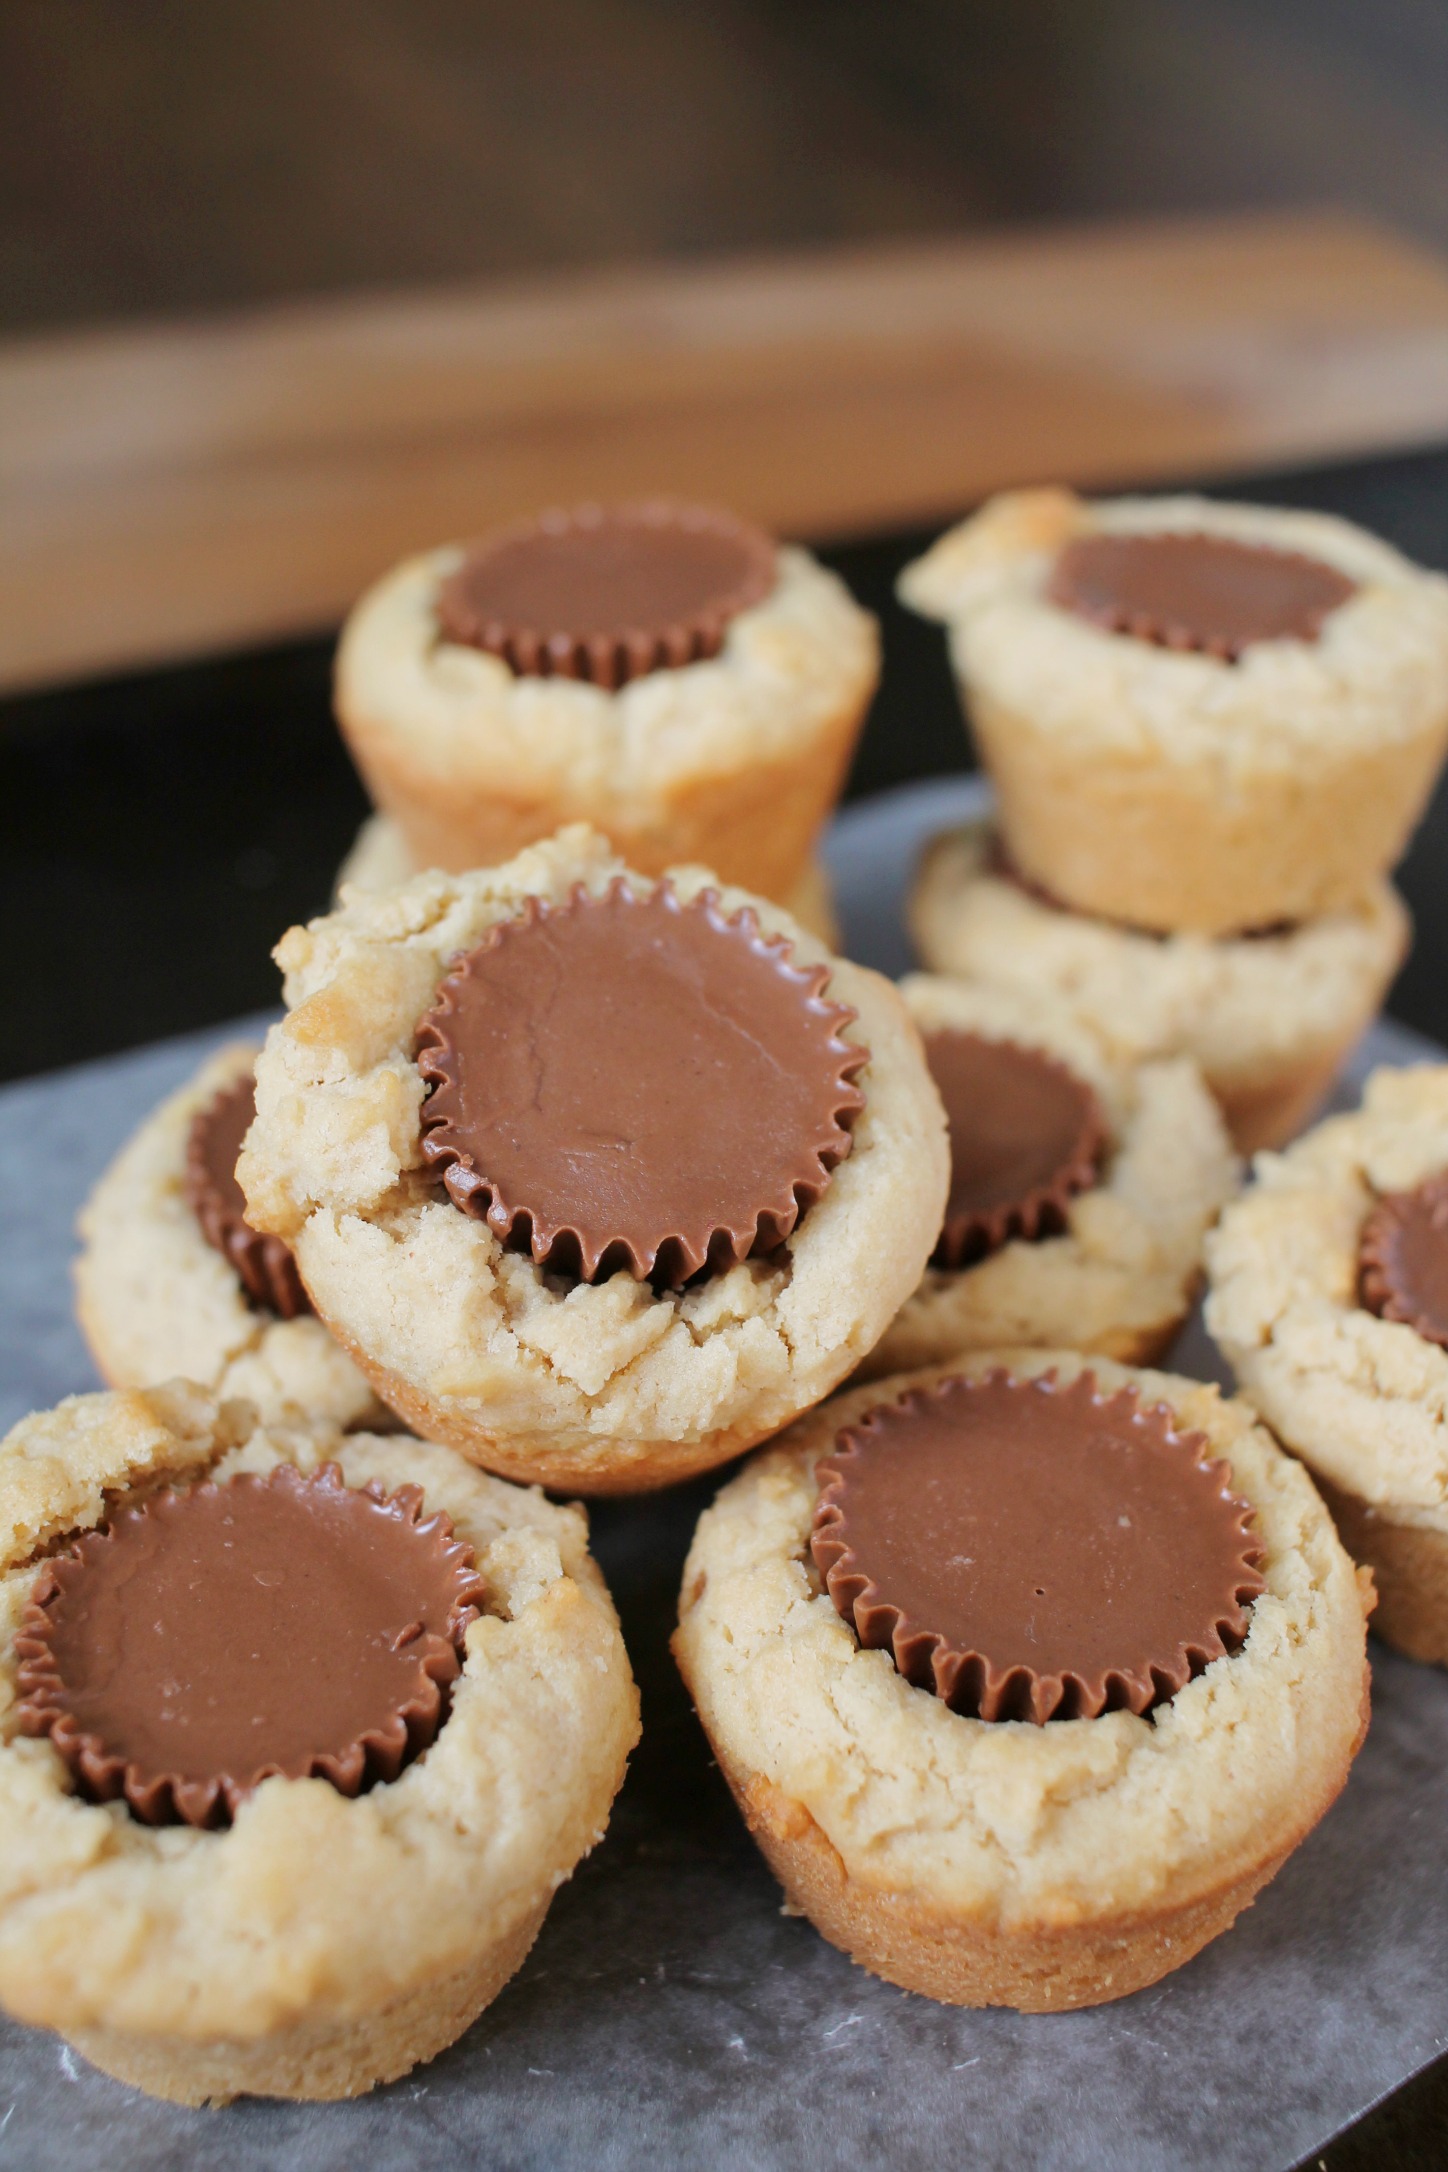
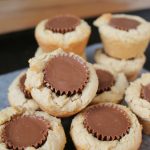
These Peanut Butter Cup Cookies are the kind of sweet little treat that disappears fast.
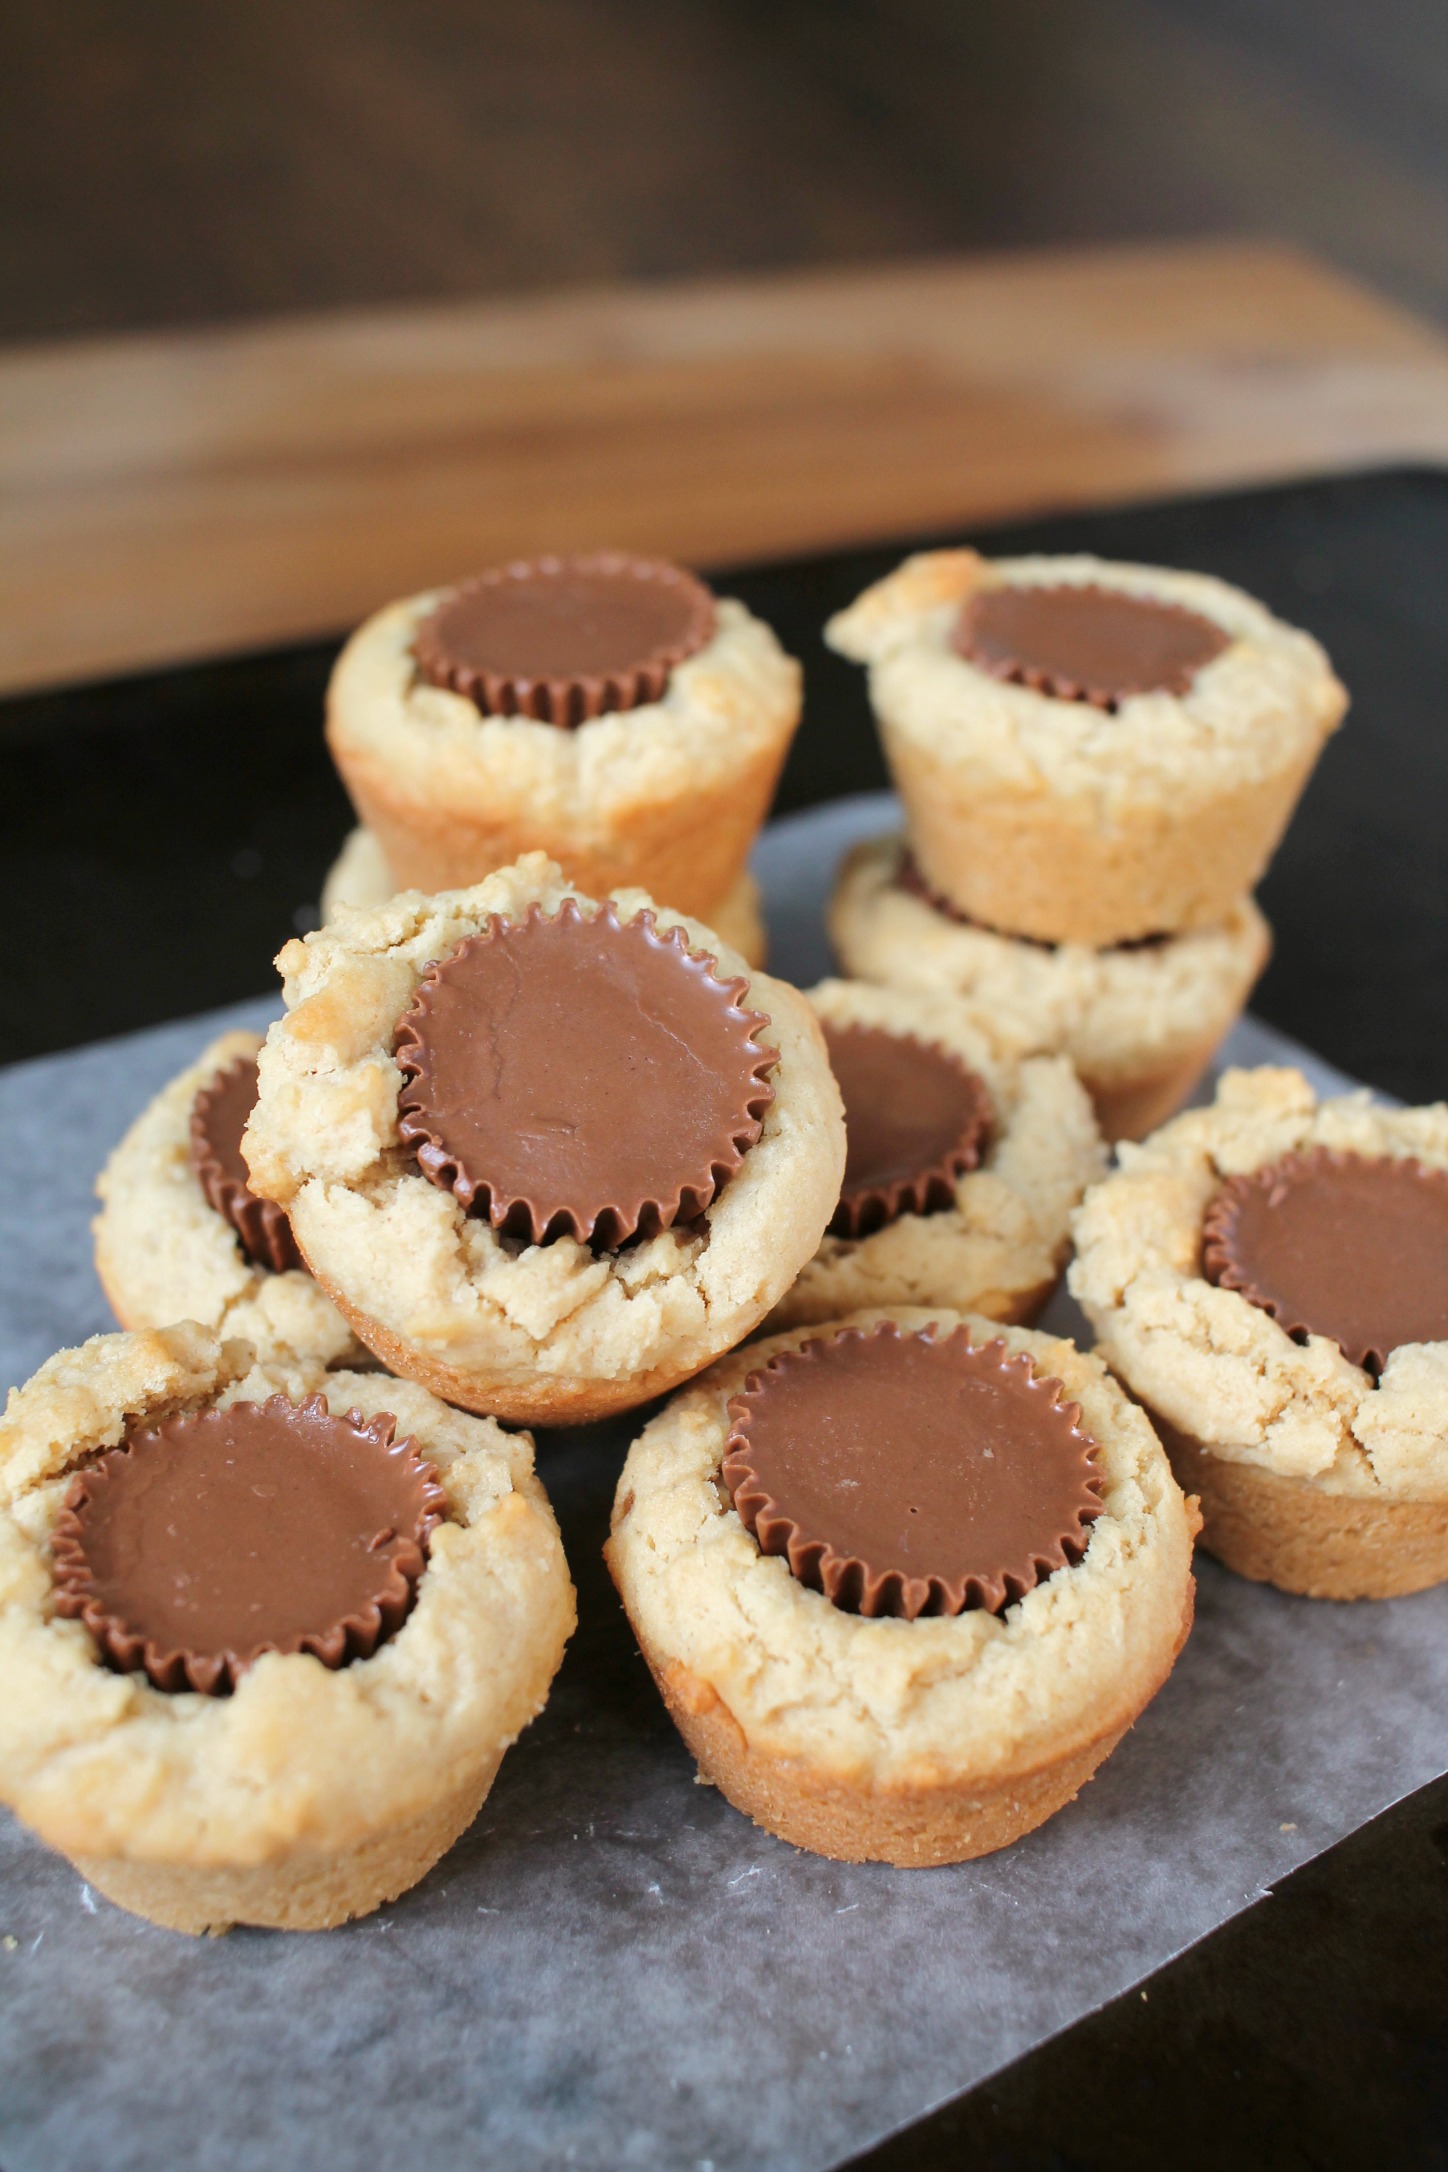
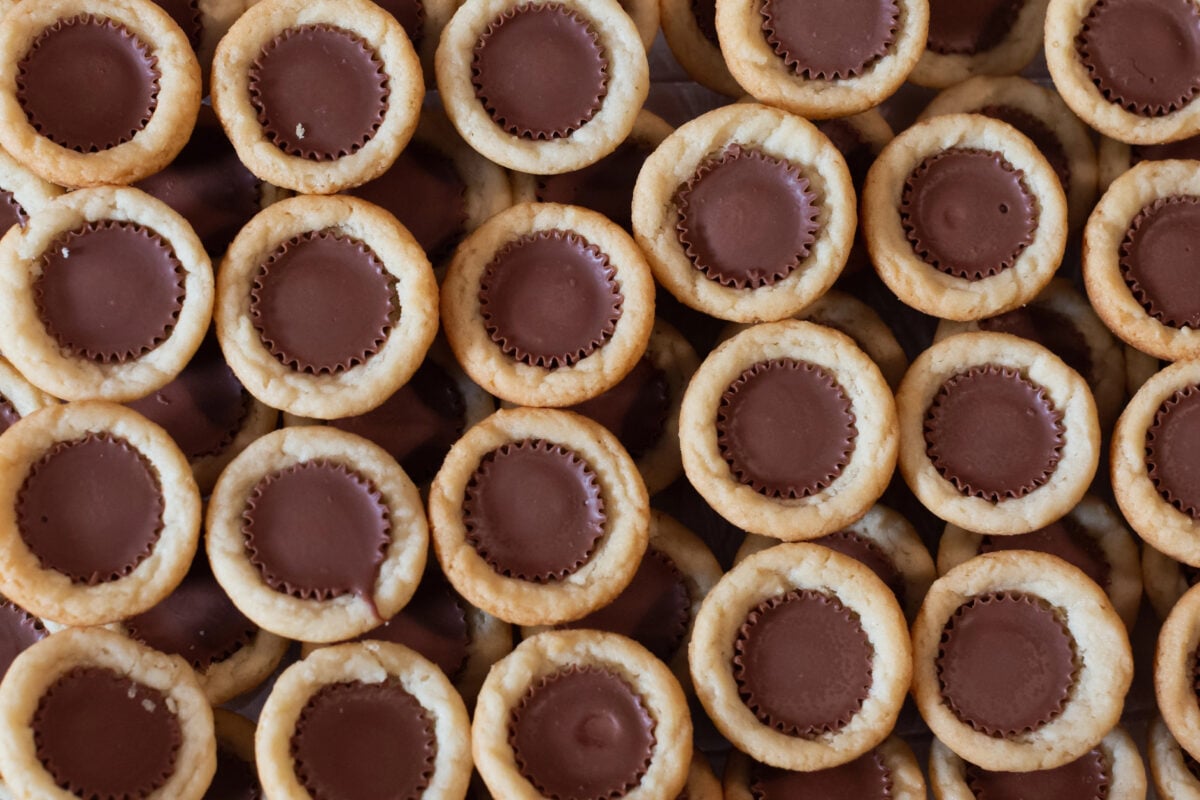
Soft peanut butter cookie dough is baked into mini muffin cups, then each warm cookie gets a mini peanut butter cup pressed right into the center. The chocolate softens, the peanut butter filling gets a little melty, and every bite turns into a cozy peanut-butter-and-chocolate moment.
Table of Contents
They’re perfect for parties, bake sales, gifting, potlucks, or a random Tuesday when you need a little chocolate-and-peanut-butter happiness. Best of all, they come together in under 30 minutes, so a warm, gooey treat is never far away.
Recipe Snapshot
These little cookie cups are quick to make, easy to share, and packed with the peanut butter and chocolate combo everyone loves.
- Flavor: Soft peanut butter cookies with a warm, melty chocolate-peanut butter center
- Texture: Tender, chewy cookie edges with a creamy mini peanut butter cup in the middle
- Time: Ready in under 30 minutes
- Difficulty: Easy enough for beginner bakers
- Perfect for: Parties, potlucks, bake sales, gifting, or a cozy homemade treat
Why You’ll Love These Peanut Butter Cup Cookies
There is a lot to love about these bite-sized treats. They are simple enough for an everyday craving, but cute and delicious enough to bring along when you need a dessert everyone will reach for.
- They use simple, familiar ingredients you may already have on hand.
- Every cookie has a mini peanut butter cup pressed into the center for an extra-special finish.
- They are bite-sized, easy to share, and always disappear quickly.
- The mini muffin pan gives them a cute cookie-cup shape with very little effort.
- They come together quickly, so you can have a warm peanut butter and chocolate treat whenever the craving hits.
Peanut Butter Cup Cookies Ingredient Quick List
Some of these ingredients will have to be set out to bring them up to room temperature if they’ve been refrigerated. This makes it easier to smoothly mix into the cookie dough.
- Butter
- Peanut Butter
- Granulated Sugar
- Light Brown Sugar
- Eggs
- Vanilla Extract
- All-Purpose Flour (Can be gluten-free)
- Baking Soda
- Baking Powder
- Miniature Peanut Butter Cups
Key Ingredient Roles
Each ingredient plays a specific role in creating soft, rich cookie cups with the perfect peanut butter and chocolate balance. Here’s what you need to know before you start baking.
- Butter (1 cup, softened): Adds richness, flavor, and a soft texture. Softened butter mixes more smoothly with the peanut butter and sugars.
- Creamy Peanut Butter (1 cup): Provides the signature peanut butter flavor and helps create a tender, rich cookie. Use creamy, shelf-stable peanut butter for the most consistent dough.
- Granulated Sugar (1 cup): Adds sweetness and helps the cookies spread slightly as they bake.
- Light Brown Sugar (1 cup): Adds moisture and a subtle caramel-like flavor, helping keep the cookies soft.
- Eggs (4 large): Bind the dough together, add moisture, and help create a sturdy cookie cup that holds the peanut butter cup center.
- Vanilla Extract (1 teaspoon): Enhances the peanut butter and chocolate flavors. Pure vanilla extract gives the best flavor.
- All-Purpose Flour (2½ cups): Gives the cookies structure and absorbs moisture so they are soft but not overly gooey. A 1:1 gluten-free baking flour can be used instead.
- Baking Soda (1 teaspoon): Helps the cookies spread and brown while baking.
- Baking Powder (1 teaspoon): Gives the cookies a little lift so they stay soft and light instead of dense.
- Miniature Peanut Butter Cups (48): Create the chocolate-peanut butter center that makes these cookie cups special. Unwrap them before baking so they are ready to press into the warm cookies.
Of course, you’ll have a few choices with the peanut butter cups! It’s usually pretty easy to just grab a bag or two of Reese’s miniature peanut butter cups and just toss any extra into the freezer for next Halloween. You could also go with a variety pack of milk and dark chocolate peanut butter cups if you like.
Equipment
You only need a few basic baking tools to make these Peanut Butter Cup Cookies. A mini muffin pan is the key to creating their cute cookie-cup shape, while the rest are everyday kitchen staples.
- Hand or Stand Mixer
- Rubber Spatula
- Mini Muffin Tin
- Wire Cooling Rack
- Airtight Container
Printable Peanut Butter Cup Cookies Recipe Card
Ingredients
- 1 cup Butter softened
- 1 cup Peanut Butter creamy
- 1 cup Sugar
- 1 cup Light Brown Sugar packed
- 4 Eggs
- 1 tsp. Vanilla Extract https://amzn.to/31LidaA
- 2.5 cups All-purpose Flour
- 1 tsp. Baking Soda
- 1 tsp. Baking Powder
- 48 Miniature Peanut Butter Cups
Instructions
- Preheat oven to 375 degrees. Spray the cups of a mini muffin tin with cooking spray.
- In a large stand mixer or with a hand mixer, cream butter and peanut butter until smooth and combined.
- Add sugar and brown sugar to butter mixture and beat at medium speed until light and fluffy, about 3-5 minutes.
- Add eggs and vanilla extract and beat until combined.
- Slowly add flour, baking soda, and baking powder. Cream at a low speed just until everything is combined.
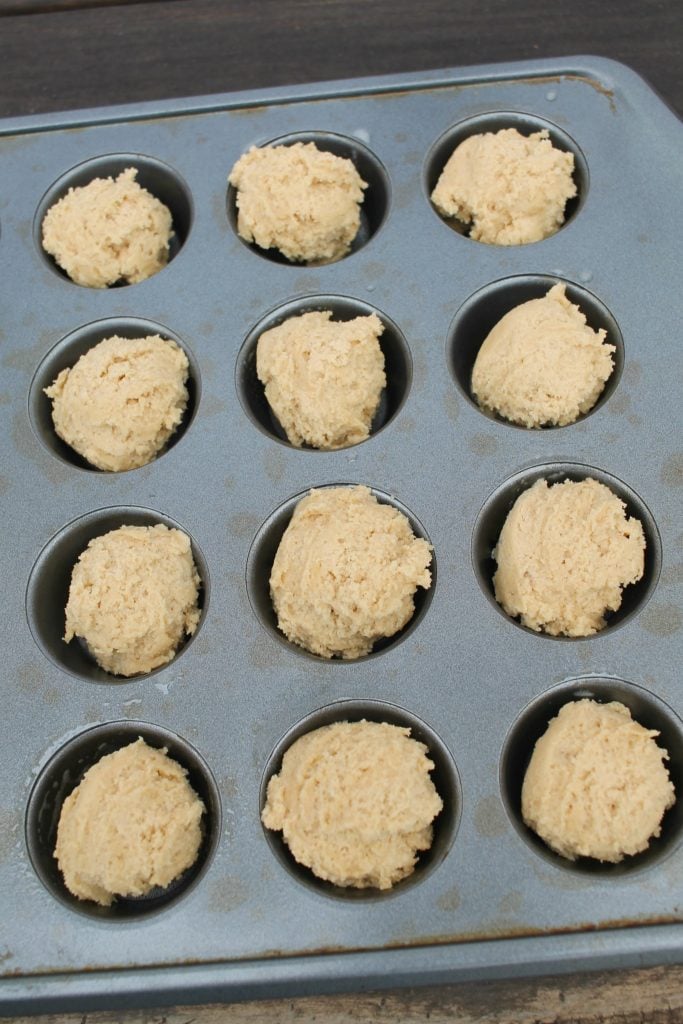
- Roll cookie dough into about 1" balls and place one in each cavity of a mini muffin tin. Do not press down on the dough at all.
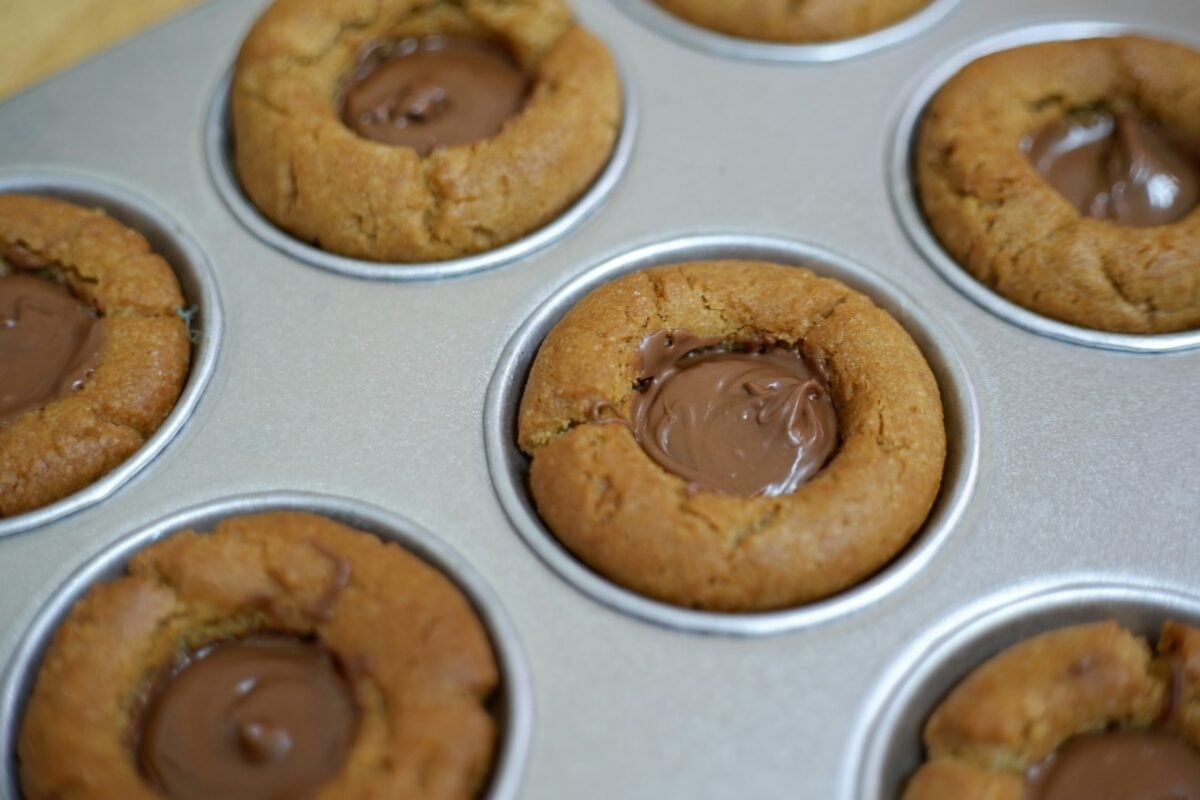
- Bake for about 8 minutes. Remove from oven and press 1 mini peanut butter cup in the center of each cookie. Let cool completely.
Notes
Pro Tips
- Grease the mini muffin pan well for easy release.
- Unwrap the peanut butter cups before baking.
- Bake just until the edges are set; do not overbake.
- Press each peanut butter cup into the warm cookies right away.
- Cool in the pan for 5 minutes before removing.
Nutrition
Method for Making Peanut Butter Cup Cookies
Let’s jump right into making these cookies. We can have them done in less than half an hour!
Step One: Preheat Oven and Prepare Pan
Preheat your oven to 375 degrees Fahrenheit (190 degrees Celsius). Spray the sides and bottoms of the muffin tin cups with cooking spray and set aside.
Step Two: Cream Butter and Peanut Butter
Place the butter and peanut butter in the bowl of your stand mixer or use a hand mixer. Cream them until they are smooth and evenly combined.
Step Three: Add Granulated Sugar and Brown Sugar
Add the granulated sugar and light brown sugar to the butter-peanut butter mix. Beat for 3-5 minutes until light and fluffy. Use the rubber spatula to scrape down the sides of the bowl as necessary.
Step Four: Add Eggs and Vanilla Extract
Add the eggs and vanilla extract and beat until combined.
Step Five: Gradually Add Flour, Baking Powder, and Baking Soda
Lightly whisk together the flour, baking powder, and baking soda in a bowl. Gradually add the flour mixture to the stand mixer’s bowl, creaming it together at a low speed until everything is combined.
Step Six: Form Balls of Cookie Dough
Roll cookie dough into 1″ balls and place each ball in a cup of the muffin tin. Do not press down on them.
Step Seven: Bake Cookie Balls
Place the cookie balls in the oven and bake for eight minutes until they are firm around the edges but still soft in the middle.
Step Eight: Add Peanut Butter Cups
Press a peanut butter cup into the center of each cookie ball. You’ll want to do this right away after taking them out of the oven because the center will still be soft enough to do this without the cookie cracking too much or falling apart.
Step Nine: Allow Cookies to Cool
After you add the peanut butter cups, allow the cookies to cool and transfer them to the wire cooling rack or an airtight container.
Step Ten: Repeat Steps Six through Nine with Remaining Dough
If you have remaining dough, repeat steps six through nine until the dough is gone.
Storage
Store leftover Peanut Butter Cup Cookies in an airtight container at room temperature for up to 4 days. For longer storage, freeze them in a freezer-safe container for up to 2 months. Let them thaw at room temperature before serving.
Pro Tips
A few simple tricks will help your Peanut Butter Cup Cookies bake evenly, release easily, and turn out perfectly soft every time.
- Unwrap the peanut butter cups first, so they are ready to press into the warm cookies as soon as they come out of the oven.
- Do not overbake. The cookies should look set around the edges but still soft in the center.
- Press gently. Push each peanut butter cup into the center just enough to nestle it in without flattening the cookie.
- Let them cool in the pan for a few minutes before removing so they hold their shape.
- Use a lightly greased mini muffin pan to help the cookie cups release easily.
Variations
These Peanut Butter Cup Cookies are delicious as written, but there are a few easy ways to switch them up for different flavors or occasions.
- Use dark chocolate peanut butter cups: Swap in dark chocolate cups for a richer chocolate flavor.
- Try peanut butter-filled chocolate candies: Small chocolate kisses or caramel-filled candies can also work well in the center.
- Add a chocolate drizzle: Once the cookies have cooled, drizzle melted chocolate over the tops for an extra bakery-style finish.
- Mix in chopped peanuts: Add chopped peanuts to the dough for a little crunch.
- Make them festive: Top each cookie with seasonal sprinkles right after adding the peanut butter cup, while the cookie is still warm.
- Add a hazelnut twist: Press a small spoonful of hazelnut spread into the center instead of a peanut butter cup for a chocolate-hazelnut version.
Substitutions for Peanut Butter Cup Cookies
Need to work around an ingredient or make these cookie cups fit your preferences? A few simple swaps can help you make a dairy-free, gluten-free, or peanut-free version while keeping that soft, rich cookie texture everyone loves.
- If you prefer dairy-free cookies, sticks of vegan or plant-based butter make a good substitute for dairy butter. Look for dairy-free peanut butter cups.
- Look for “certified gluten-free” labeling on your ingredients if you want gluten-free cookies. “Certified gluten-free” basically means that the processing facility took extra steps to avoid cross-contamination with gluten-containing foods. For gluten-free flour, look for ones like the King Arthur brand that are easy to use as a replacement for wheat flour at a 1:1 ratio.
- Most nut and seed butters will work as a substitute for peanut butter, although you may notice some slight differences in the “nutty” or “seed” flavor they add to the cookies. Make sure they’re the “creamy” version for easier mixing. I like to use cashew butter and almond butter too.
- Zero-calorie brown sugar replacements aren’t my favorite thing in the world, but if you want to reduce the amount of sugar in this recipe, the Truvia brand works best as a brown sugar alternative for baking.
- You could also try coconut sugar as a replacement for granulated sugar if you don’t mind a slight coconut flavor in your cookies.
Troubleshooting Guide
Did your peanut butter cup cookies come out not quite right? They can be tricky to get exactly right the first couple of times because they’re a little bit different from ordinary cookies. Here’s a quick rundown of what might cause common issues with these cookies and how to fix them.
Trouble with pushing the peanut butter cup into the middle after baking cookies.
If the cookies fall apart or crumble too much while inserting the peanut butter cup into the cookie, one likely explanation is that they were overbaked. The cookies should still be a little bit soft in the middle when you get them out of the oven.
Inserting the peanut butter cup is also easier if you do it before the cookies have a chance to cool much. One reason for this is that the center of any baked good tends to finish setting as it cools, so they might still be just a smidge gooey when you’ve just gotten them out of the oven. That’s why it’s easier to insert the peanut butter cup, then let the cookies cool.
The cookies are too dry or crumbly.
One likely explanation is that the dough had too much flour or too little liquid. Flour tends to be quite good at absorbing moisture, so it’s something to look out for when measuring the flour and wet ingredients. That’s why I don’t like to pack down the flour or add heaping cups when I add it to the dough. If the dough seems too dry, I’ll gradually add water, one tablespoon at a time, until the dough seems moist enough.
In some cases, I’ll even measure the flour in grams with my handy digital food scale to make sure I’m getting the correct amount. Because flour can actually vary in density depending on the brand and type of flour used, 1 cup of all-purpose flour can vary from 120 grams to 136 grams. I’ll often aim for the lower end of that to make sure I’m not packing in too much flour.
The cookies might have also been overbaked, so I don’t like to have them in the oven for much longer than eight minutes. The oven might also run a bit hot if you’re sure you preheated it to 375 degrees Fahrenheit, and they still came out overdone.
The cookies are too gooey.
Cookies will often come out gooey if they are underbaked or too much liquid was added. It may help to calibrate your oven to make sure it isn’t running cool or add a little less liquid next time. If the dough seems too moist, adding an additional tablespoon or two of flour might help.
Baked goods can also seem gooey if they didn’t cool for long enough. After you’ve inserted the peanut butter cups, be sure to let them cool completely so the centers can finish setting.
The peanut butter cups melted and made a mess.
Did you try to bake the peanut butter cups with the cookies? That’s why I wait to insert the peanut butter cups until after the cookies have baked. The outside of the chocolate layer should get a little melty on the sides and bottom, but it shouldn’t melt so much that it gets all gooey and makes a mess.
The cookies stuck to the muffin tin cups.
The sides and bottoms of muffin tin cups should be lightly sprayed with cookie spray. They’ll usually just need a quick spray, but you also want to make sure you cover most of the surface.
The cookies puffed up more than expected while baking.
It’s possible that too much of the leavening agents (baking soda and baking powder) were added. This happens most often when someone gets teaspoons and tablespoons mixed up. Tablespoons are the big ones. You don’t need to add a heaping teaspoon of leavening agents, and be sure to watch out for measuring spoons that have both “1 teaspoon” and “1 1/2 teaspoon” measuring options. (Some older measuring spoon sets have that, so you might see it if you inherited your measuring spoons from your parents or grandparents!)
The cookies disappeared from the container I was transporting them in while I was taking them and the kids to Grandma’s house.
Check the kids’ faces and fingers for chocolate or crumbs before you do anything else.
FAQ About Peanut Butter Cup Cookies
I think these cookies are easy to make, but we do sometimes get questions! I did my best to answer the most commonly asked questions here. If you have a question I haven’t answered yet, feel free to answer in the comments section, and we’ll do our best to answer as soon as possible.
Can I make these cookies ahead?
These cookies can stay fresh in an airtight container for 2-3 days at room temperature, so they’re great for making a day or two before you need them! If you need to store them longer (which is rare in my experience), they can also be frozen in an airtight container.
Will they fall apart if I have to transport them?
Usually not, if they aren’t too crumbly and you aren’t hitting too many potholes at high speed while driving to wherever you need to take these cookies. (Basically, don’t do anything too crazy, and you and your cookies should make it in one piece!)
Should I unwrap the peanut butter cups while the cookies are baking?
Yes, this is the perfect time to unwrap them. Have all of the mini peanut butter cups ready so you can press one into each warm cookie as soon as the pan comes out of the oven.
Can I use a different type of candy in these cookies?
Absolutely! Mini chocolate kisses, caramel-filled chocolates, or other bite-sized candy pieces can work well. Just choose a candy that is small enough to fit neatly in the center of each cookie cup.
How easy is it to make this gluten-free?
It’s doable! Just look for a gluten-free flour or flour blend that’s easy to replace the wheat flour with at a 1:1 ratio. Also, look for a “certified gluten-free” label on the ingredients whenever appropriate.
I think I need to double this recipe!
Definitely! This recipe doubles easily, making it a great choice for parties, bake sales, or when you want extra cookies to share.
More Easy Cookie Recipes
Looking for a few more sweet treats to add to your baking list? These easy cookie recipes are perfect for sharing, gifting, or enjoying whenever a cookie craving hits.
- Gluten-Free Vegan No-Bake Cookies
- Gingerbread Thumbprint Cookies
- Frosted Lime Cookies
- Pumpkin Snickerdoodle Cookies
- Chocolate Chip Meringue Cookies
No matter which one you choose, you’ll have an easy homemade cookie that is ready to share—or keep all to yourself.
Tell Us What You Think!
Did these peanut butter cup cookies disappear fast? Feel free to let us know what you think in the comments, and don’t forget to rate this recipe!