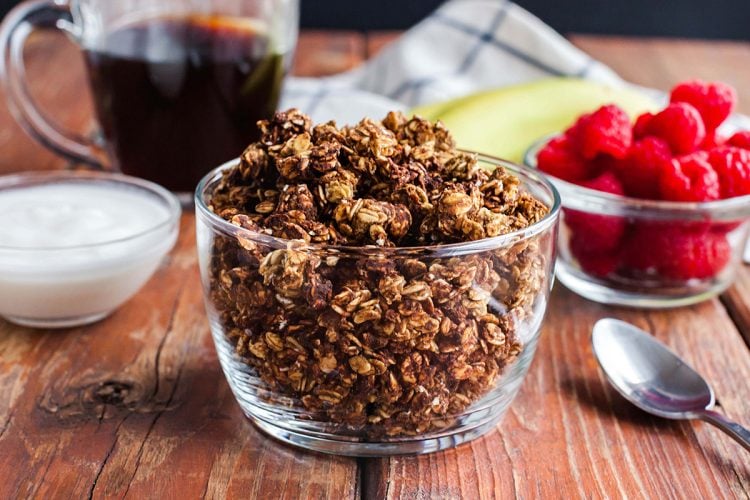
These no-bake peanut butter protein bars are chewy, lightly sweet, and packed with plant-based protein without protein powder, refined sugar, or dairy. They’re freezer-friendly, gluten-free, and perfect for busy mornings, post-workout fuel, or an afternoon energy boost.
Best of all? You can make them in under 15 minutes using pantry staples.
Table of Contents

Why This Recipe for No-Bake Peanut Butter Granola Bars?
What I like most about this recipe is that you can control what goes in them. There’s no refined sugar. In fact, most of the sweetness comes from the peanut butter, agave, and applesauce. So there’s a lot to like about these granola bars and not much that’s not to like.
Plus, they’re super easy to make! You’d have to seriously not be paying attention to mess this recipe up. Just boil a couple of ingredients in a saucepan and mix everything together.
What You’ll Need
You’ll probably have most of the equipment you’ll need in your kitchen already. If not, they’re usually easy to find wherever you normally buy your kitchen supplies.
- A saucepan
- A medium-sized mixing bowl
- A sturdy mixing spoon
- An 11X7 pan or granola bar pans
Ingredients for Peanut Butter Granola Bars
The cool part is that this basic peanut butter granola bar recipe only takes six ingredients!
- Old-Fashioned Oats
- Coconut Milk Powder
- Peanut Butter Powder
- Light Agave Syrup
- Unsweetened Applesauce
- Salt
About These Ingredients
The important thing with granola bars is to keep it simple. These six ingredients bring the right texture and mild, nutty, sweet flavor to these snack bars!
Old-Fashioned Oats
1 1/4 cup old-fashioned oats
What I like about old-fashioned oats is that they are less processed than instant oats and are typically ready to go faster than steel-cut oats. Old-fashioned oats are also called “rolled oats” because they’ve been steamed and then rolled into flat, thin, oval flakes.
They typically have a moderate cooking time of 5-10 minutes, making it easy to prepare any leftover oats from this recipe for breakfast (though you don’t have to cook them here).
Coconut Milk Powder
1/2 cup coconut milk powder
Coconut milk is made by drying coconut milk or cream. This gives it a convenient form for recipes like this one that don’t need as much liquid as coconut milk would have added.
Peanut Butter Powder
1/2 cup peanut butter powder
Just like it sounds, peanut butter powder is just the powdered version of peanut butter. Most of the oil has been removed from the peanuts before the grinding process normally used to make peanut butter. That means it’s actually much lower in fat than ordinary peanut butter is!
When I’m not using peanut butter powder in these granola bars, I’ll often toss a tablespoon or two of this into my morning smoothies.
Unsweetened Applesauce
1/2 cup unsweetened applesauce
This is actually where we get a lot of the liquid for this recipe from. Plus it adds the natural sweetness of apples. (I’ll be honest, I’ll sometimes go out of my way to find an applesauce that’s been made with sweeter varieties of apples like Fuji, Honeycrisp, or Golden Delicious.)
Light Agave Syrup
1/4 cup light agave syrup
Agave syrup adds a lot of sweetness to these protein bars. While you can adjust the amount of agave syrup to your taste, the thing to remember is that it is super sweet!
Salt
Pinch of salt
The salt helps balance the sweet flavor of the other ingredients. I typically go for a light pinch of salt to avoid overdoing it with the salty flavor.

Printable No-Bake Peanut Butter Granola Bars Recipe Card
Ingredients
- 1 1/4 cup old fashioned oats
- 1/2 cup coconut milk powder
- 1/2 cup peanut butter powder
- 1/2 cup unsweetened applesauce
- 1/4 cup light agave syrup
- pinch of salt
Instructions
- Place oats, peanut butter powder, coconut milk powder and pinch of salt in medium sized bowl.
- In small saucepan on stove, combine syrup and applesauce. Bring to a boil.
- Pour saucepan ingredients over dry ingredients and mix really well.
- Let sit for 10 minutes so oats can absorb liquid.
- Place in your greased 11×7 pan or (no grease needed) granola bar pan.
- Freeze for 30 min to an hour.
- Remove from freezer, let sit 5 minutes, then pop out of granola bar pan. You may need for them to sit out longer before cutting into bars if using a 11×7 pan.
- Store in fridge or freezer.
Notes
- find coconut milk powder in your grocery store’s baking aisle by the powdered milk products.
- find peanut butter powder near peanut butter
Method for Making No-Bake Peanut Butter Protein Bars
With everything measured and ready to go, it’s time to turn these simple ingredients into firm, protein-packed bars, no oven required.
Step One: Mix Dry Ingredients
Mix oats, peanut butter powder, coconut milk powder, and a pinch of salt in a medium-sized bowl.
Step Two: Bring Wet Ingredients to a Boil
Combine syrup and applesauce in a small saucepan. Bring to a boil over medium-high heat on the stovetop. Watch it carefully to make sure it doesn’t bubble over. You don’t have to boil it for long, so don’t wander away!
Step Three: Mix Saucepan Contents With Dry Ingredients
Promptly pour the saucepan contents over the dry ingredients and mix together with a sturdy spoon until all the dry ingredients are evenly mixed in. There should be no leftover dry ingredients on the bottom of the bowl.
Step Four: Let Stand for Ten Minutes
Let the mixture stand at room temperature for ten minutes to let the oats absorb the moisture.
Step Five: Grease the 11X7 Pan
While the mixture is standing, grease the 11X7 pan. You can skip this step if you’re using a granola bar pan.
Step Six: Transfer Mixture to Pan
Transfer the mixture to the pan. If you’re using the 11X7 pan, evenly spread it out to about the thickness you want your granola bars to be. (I typically aim for about 1/4 to 1/2 inch thick, but it doesn’t have to be exact.) If you’re using the granola bar pans, evenly distribute the mixture between the granola bar holders.
Step Seven: Freeze Granola Bars
Place the pans of granola bar mixture in the freezer. Freeze for 30 minutes to 1 hour.
Step Eight: Remove From Freezer and Let Stand
Remove the pans from the freezer and let them stand out for at least five minutes. They might have to stand out for longer if they are on the 11X7 pan.
Step Nine: Cut Bars or Remove From Granola Bar Pan
If they are on the 11X7 pan, cut them into bars at about the size you want. Alternatively, remove them from the granola bar pan.
Step Ten: Eat or Keep in Refrigerator or Freezer
Of course, eating them is the fun part! If you aren’t going to eat them right away, they can be kept in the refrigerator or freezer. If you keep them in the freezer, just be sure to thaw them out in the fridge overnight before you eat them.

Nutrition Information for Peanut Butter Granola Bars
The nutrition information shown here is approximate and based on the recipe as shown. It was calculated by VeryWell Fit’s nutrition calculator using the recipe as shown. Feel free to explore more nutrition information on individual ingredients at the USDA’s FoodCentral database.
- Servings: 10
- Calories: 31
- Total Fat: 1.4 grams
- Saturated Fat: 1.1 grams
- Cholesterol: 0 milligrams
- Sodium: 3,879 milligrams
- Total Carbohydrates: 4.4 grams
- Dietary Fiber: 0.4 grams
- Total Sugars: 2.8 grams
- Protein: 0.5 grams
Substitutions and Variations for No-Bake Peanut Butter Granola Bars
You could try almond butter powder as a substitute for peanut butter powder. Sunflower seed butter powder can also work if you want a nut-free version.
Almond milk powder can work if you can’t find coconut milk powder.
Sometimes when I’m craving chocolate, I’ll mix chocolate chips or dark chocolate pieces into the mixture after letting the mixture sit.
Dried berries or small pieces of dried fruit work well, too.

FAQ About These Peanut Butter Granola Bars
Here are answers to common questions about these bars, and if you’re still wondering something, drop it in the comments below!
Are these no-bake peanut butter protein bars actually high in protein?
I’ll be honest, a serving size isn’t all that big, but these pack a protein punch for their small size! These bars get their protein primarily from peanut butter powder and old-fashioned oats, both of which contribute plant-based protein and fiber. While they don’t contain protein powder, they’re a balanced snack that helps keep you full and energized.
How long can these peanut butter oat bars last in the fridge?
They can last about two days in the refrigerator or seven days in the freezer.
Are these peanut butter granola bars kid-friendly?
I’ll be honest, I’ve had houseguests’ kids swipe them out of my fridge before! Like a lot of store-bought granola bars, these should also go over well in kids’ lunch boxes. So they’re pretty kid-friendly. (Just don’t tell them they’re healthier than many store-bought granola bars.)
I’m out of rolled oats! Can I use quick oats instead?
You can, but the bars will be softer and less chewy. Old-fashioned or rolled oats provide more structure and bite, which helps the bars hold together better once chilled.
Are these peanut butter protein bars gluten-free?
They are gluten-free as long as you use certified gluten-free oats. Oats are naturally gluten-free, but cross-contamination can occur during processing, so certification matters for anyone with a gluten sensitivity.
Why are my no-bake protein bars crumbly or too soft?
Crumbly bars usually need more moisture or binding. Try adding an extra tablespoon of applesauce or agave syrup. If the bars are too soft, let them chill longer or add a small amount of oats to balance the texture.
Can I double this recipe for a larger batch?
This recipe is super easy to double or even triple! You may just need to use a larger saucepan and larger pans to lay them out on. They may also have to chill for longer before you cut them into bars.
I’d like to make the bars larger or smaller. Is that doable?
It’s definitely doable! It just means tweaking the number of bars you’ll get out of this recipe or scaling the amounts up or down to suit.
More Yummy Snack Recipes
If you love easy, wholesome snacks that come together without much fuss, these reader-favorite bars and bites are worth adding to your list:
- Peanut Butter Pumpkin Chocolate Chip Granola Bars (Vegan + Gluten Free)
- Apple Almond Sweet Potato Granola Bars
- Healthy Banana Oat Seed Bars
- Banana Oat On the Go Breakfast Bars
Keep the snack inspiration going with these wholesome, grab-and-go favorites, perfect for meal prep, lunchboxes, or quick energy boosts.
Tried This Recipe? Let Us Know!
Did you try this recipe? If so, be sure to let us know what you think in the comments! We’d also love to hear about it if you came up with any yummy variations for this recipe!